
In this guide I am going to show you how to connect a Nokia 5110 LCD display with Arduino to be able to print texts and numbers on it.
Among the advantages are consumption, since this display will consume approximately 0.25ma with the light off (15ma with the light on). This makes it ideal for projects with batteries in which we are interested in lasting as long as possible.
In addition to the consumption advantage, it also has the advantage of being able to display small graphics and includes a backlight.
If you want to see more guides on this screen, do not hesitate to stop by part 2 of my blog:
Nokia 5110 LCD, show text with Arduino (Part 2)
Nokia 5110 LCD, show graphics with Arduino (Part 3)
Index
Required materials
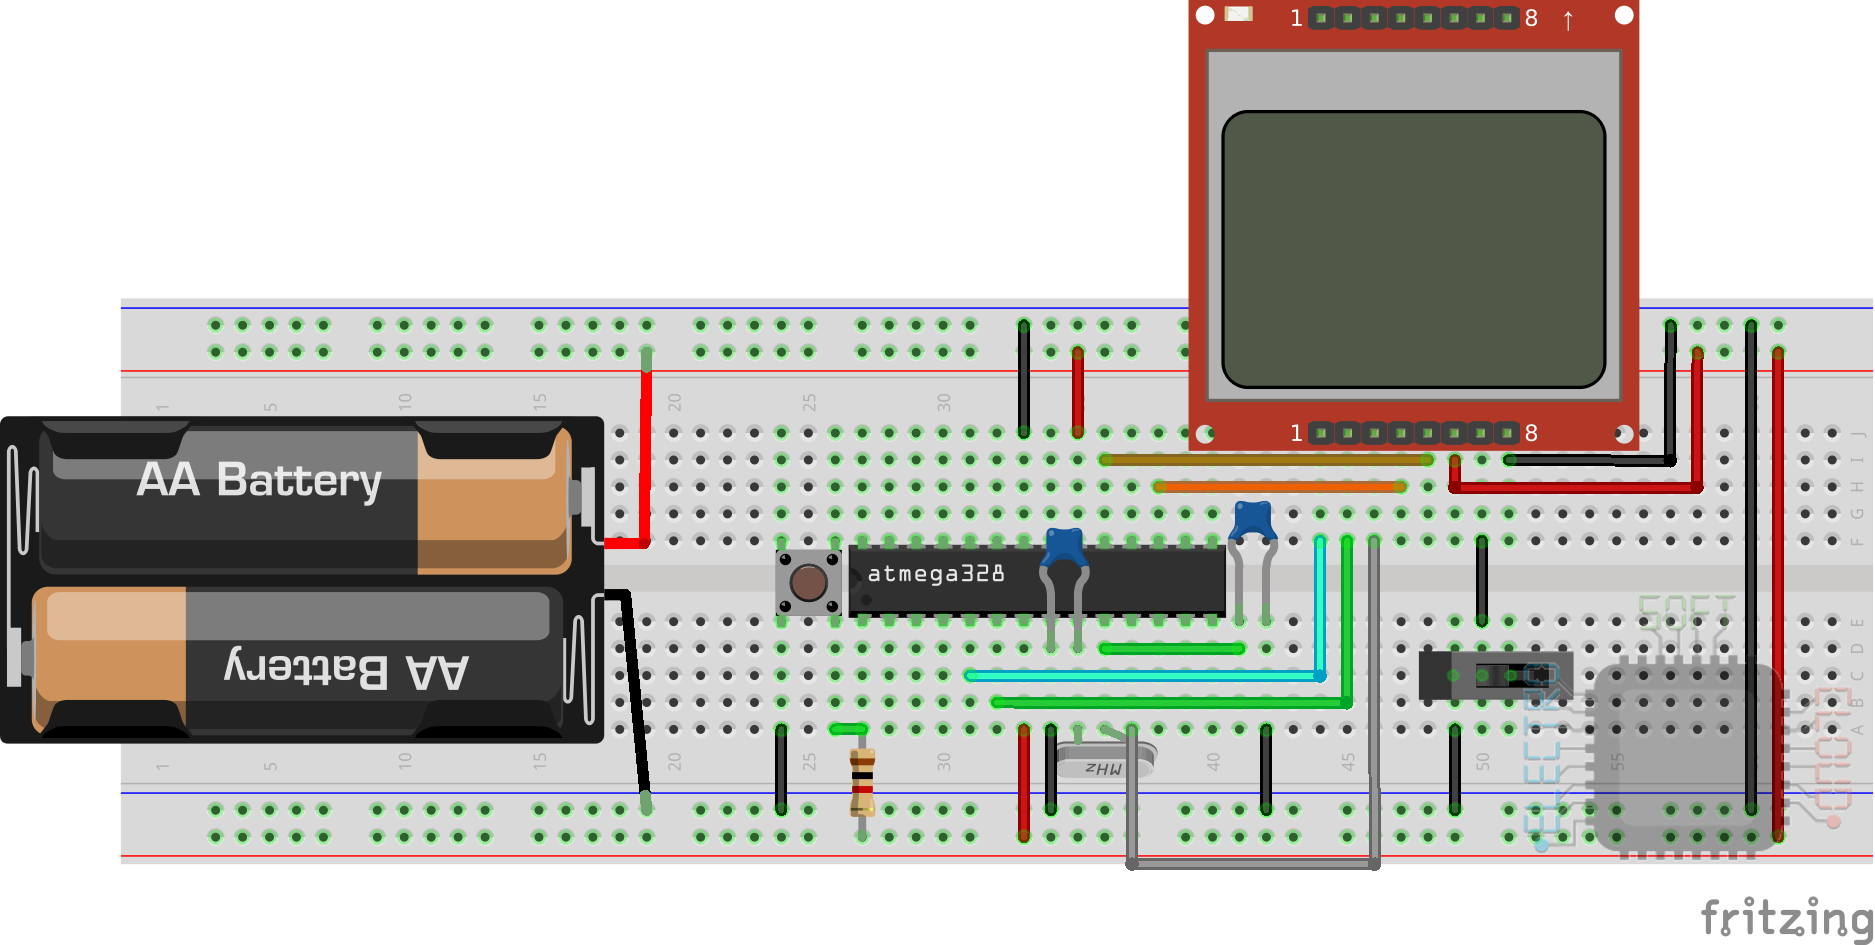
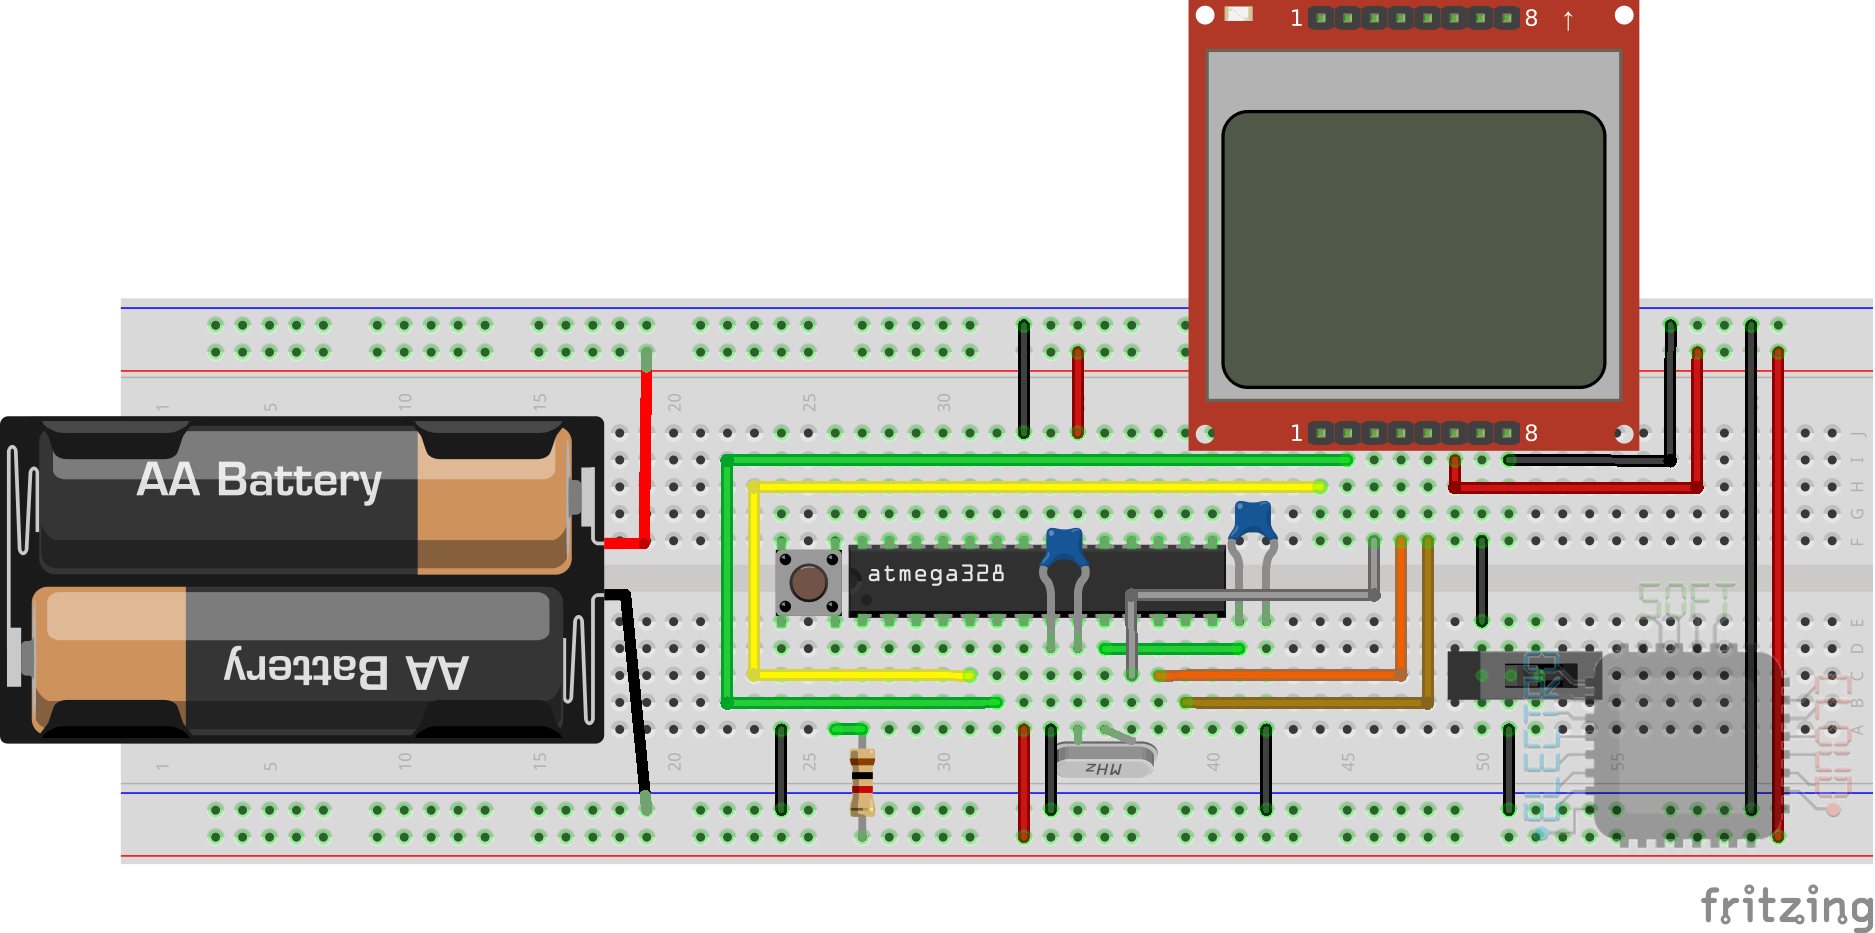
The list of materials necessary to be able to assemble the circuit using an Arduino circuit with the basic components are as follows:
| Breadboard |
| Jumpers or connecting cables |
| An ATMega328p chip |
| A 16Mhz quartz crystal |
| Two 22pf ceramic capacitors |
| 1k resistor |
| Five 10k resistors |
| Nokia 5110 display |
Of course, this can also be mounted with an Arduino Uno, nano … for which you would only need:
| Breadboard |
| Jumpers or connecting cables |
| Arduino |
| Nokia 5110 display |
| Five 10k resistors |
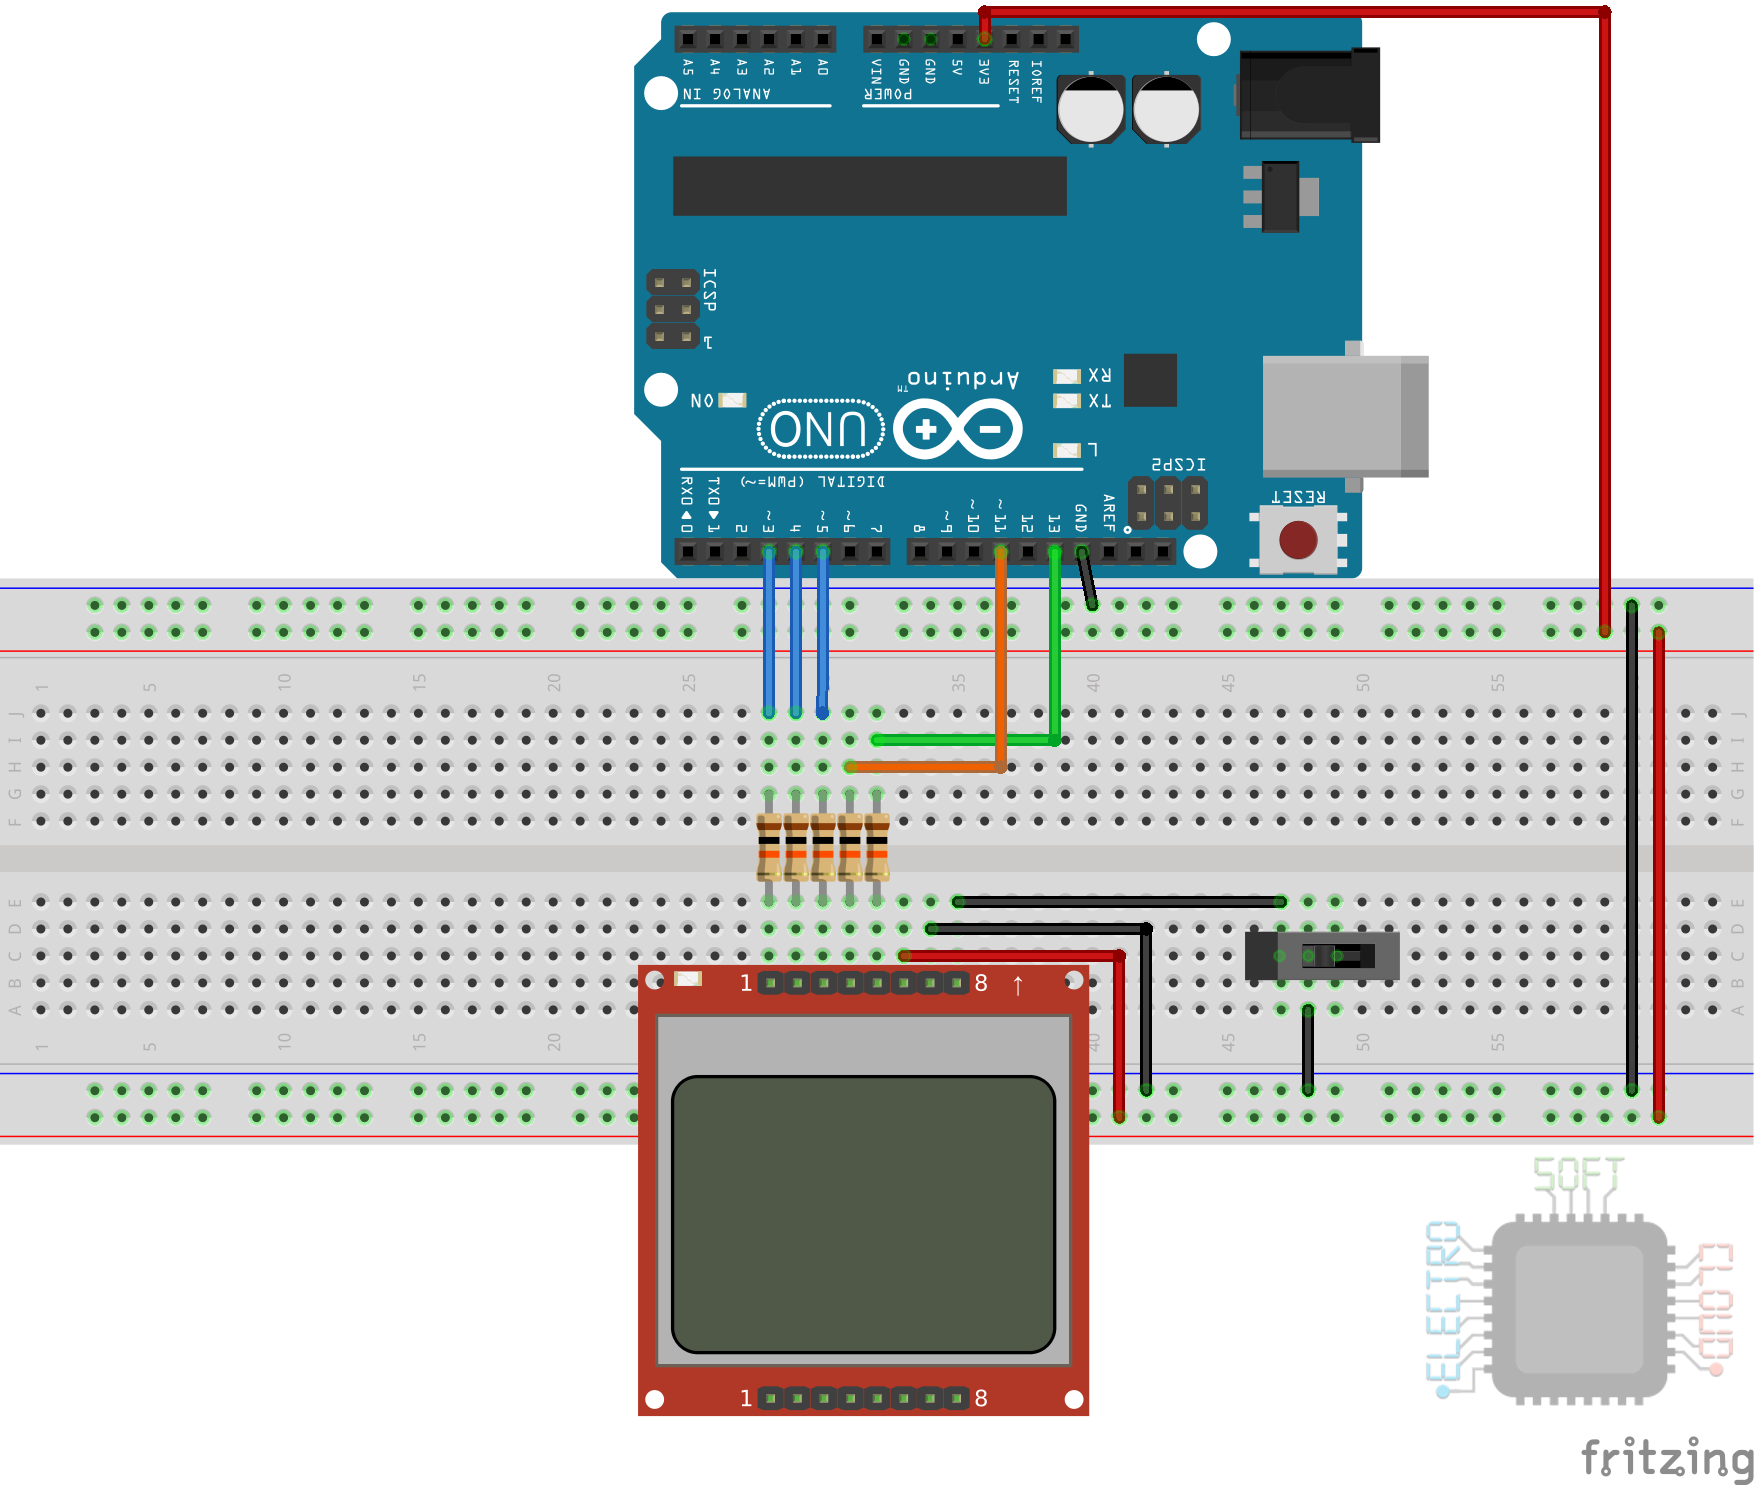
NOTE: If your Arduino works with 3.3v or your display accepts 5v, you don’t need the five 10k resistors. They are used to adapt the voltage of your Arduino, which is 5v, to the 3.3v with which the display is compatible.
Technical data
Esta pantalla dispone de los siguientes datos técnicos:
| Display technology | Dot matrix LCD |
| Display controller | Philips PCD8544 |
| MCU interface | SPI |
| Screen size | 1,5 inch |
| Resolution | 84×48 pixels |
| Operating voltage | 2.7v – 3.3v (some accept 5v) |
| Current draw | 50mA max |
| Vision angle | 180º |
| Backlight | Red, Blue, Green or White |
Pinout
The Nokia 5110 LCD displays are all the same, but depending on the model the order of the pins may vary. Here I will put the one that I have seen the most times and the one that matches my display, but I recommend you check that it matches yours.

Just as the order of the pins can change between displays, the BL (BackLigth) pin voltage can vary as well. Some displays require 3.3v and therefore a 330Ohm resistor must be added if we connect it to 5v. Others directly accept 5v, and others such as mine, use GND to activate the light. As a recommendation and for safety, I recommend always connecting these displays to 3.3v, or adding a resistor to limit the current. This way you will always make sure that it works and does not burn.
Connection with Arduino
This display can be controlled with Arduino in two ways:
- Hardware
- Software
The difference between the two is that the hardware updates are faster, but it can lead to incompatibilities if we use other SPI devices. Software updates, however, have the defect of being a little slower, but instead have more flexibility in connecting the pins.
Regardless of which one you choose, remember to configure it in the module initialization, or else it will not work.
Hardware
If you do not use more SPI devices, it is perhaps your best option, since it allows you to update the data more quickly. The connections to use this mode would be the following:
Software
On the other hand we have the SPI connection by software, which allows us to connect the pins as best suits us. The library urges us to use the connections as follows:

Library installation
Regardless of how well we have connected our Arduino, if we do not have the library to use it, it will not do us much good. For this there are different libraries, but I specifically use the Adafruit one, which has always given me a good result and has many options.
To proceed to install the Adafruit library, we will follow the following steps:
We go to library management

Once there, we will look for the library on 5110 and install the Adafruit one, which usually comes out the first

In case you ask whether to install the dependencies, we would have to click on yes, as this will ensure that you install everything necessary.
It is very likely that after installing the above library, a dependency of this one has not been installed, which is called Adafruit GFX Library. To install it and that the display does not fail we will have to find it and install it, so we will follow the steps followed above: search for Adafruit GFX and give it to install.

With this we would already have the library installed and ready to use it in our projects.
Code: show text
Once the libraries are installed we will proceed with the basics that will be showing text on the LCD display Nokia 5110 with Arduino. For this we can use functions similar to those used to debug our applications.
#include <SPI.h>
#include <Adafruit_GFX.h>
#include <Adafruit_PCD8544.h>

// Software SPI (slower updates, more flexible pin options):
// pin 7 - Serial clock out (SCLK)
// pin 6 - Serial data out (DIN)
// pin 5 - Data/Command select (D/C)
// pin 4 - LCD chip select (CS)
// pin 3 - LCD reset (RST)
Adafruit_PCD8544 display = Adafruit_PCD8544(7, 6, 5, 4, 3);

// Hardware SPI (faster, but must use certain hardware pins):
// SCK is LCD serial clock (SCLK) - this is pin 13 on Arduino Uno
// MOSI is LCD DIN - this is pin 11 on an Arduino Uno
// pin 5 - Data/Command select (D/C)
// pin 4 - LCD chip select (CS)
// pin 3 - LCD reset (RST)
// Adafruit_PCD8544 display = Adafruit_PCD8544(5, 4, 3);
// Note with hardware SPI MISO and SS pins aren't used but will still be read
// and written to during SPI transfer.  Be careful sharing these pins!

void setup()   {
  // Initialize the display
  display.begin();

  // Set the contrast we want for a better vision
  display.setContrast(57);

  // Clean the display buffer.
  display.clearDisplay();

  // Show the text
  display.setTextSize(1); // Text size 1
  display.setTextColor(BLACK); // Black color (default)
  display.setCursor(0,0); // Set 0,0 position
  display.println("Hello World!"); // Write Hello World!
  display.display(); // Refresh the display to show the changes
}

void loop() {}
As you can see in the code, it is used just like the Serial function. We can use display.print to write and that the position of the cursor stays at the end of what is written, or we can use the example display.println to go to the next line.
We also have the function display.display(), which is very important. This function is responsible for refreshing the display with the data that we have written in the buffer. We could write all over the display and nothing would be shown until executing this function.
And here is the basic guide on how to use our Nokia 5110 LCD display on Arduino. I hope you liked it and that it serves you, and as always, comments are welcome.
Greetings!