
This time I am going to talk about how to use the bluetooth connection BLE (Bluetooth Low Energy) in our ESP32. At the consumption level it may not contribute much since the consumption of the ESP32 processor is not low, but what it will provide us is an advanced communication interface that will allow us to add security, have various services, … For example, you could create a sensor for a weather station and create a service for temperature, another for humidity, … When reading the data you could choose which one you want without having to read all of them and then separate them.
The first thing we need to know is what BLE is: It is a bluetooth technology that allows communication between two devices with very low power consumption. This allows devices such as bluetooth beacons to last several years with a simple button battery. In addition to this, it also includes encryption and configurable security, so we can protect our connections from external eavesdroppers.
In this guide I will show you how to configure the ESP32 in host and client mode, in order to exchange data between compatible devices. I also recommend that you take a look at my getting started guide, in which I teach how to make a serial connection between devices.
How the data is organized
Before launching into our communications using BLE, it is very important that we know how the data is organized. The data structure is hierarchical and divided into sections. These sections are profiles, services, and features.

Profiles
A profile is a set of services that are defined by the Bluetooth SIG (Bluetooth Special Interest Group). For example, you can download the profile of a blood pressure sensor (in English) from here. You can see an extensive list of official profiles on the official bluetooth page.
If you got scared when you saw the 44 page document about the profile, don’t worry, I just wanted you to take it into account;). It is not necessary to comply strictly with it for a connection between two ESP32 for example, since we can invent our own profile. This type of information is useful for you to know if you are going to create a device and you want it to be compatible with others, but if the use is going to be private it is not important.
Services
Services are simple groupings of data, such as information from a sensor. They are divided into characteristics, and serve to group them.
The use of the services serves for example, that you have a device that has several sensors. Instead of creating a single service with all the data, you could create a service per sensor and thus have the data organized.
The services have a unique identifier called UUID, which is 16 bits for official services, and 128 bits for custom services. Some services such as battery level, blood pressure … as well as profiles, are defined by the Bluetooth SIG. For example, the UUID of a blood pressure sensor service is 0x1810, and the pulse is 0x180D.
You can see all the data also on the official Bluetooth page. In this document you can find the different UUIDs depending on the type of service we are implementing. As with profiles, this information is only useful if we are going to create a device that we want to be compatible with others. If the use is private, we can generate our own UUID, for which we can use any tool such as this page.
Characteristics
A characteristic is each one of the values that we want to include in the services. For example, a service for a DHT11 / 22 sensor could contain two characteristics, which would be temperature and humidity. An accelerometer service could contain three characteristics for each of the axes (X, Y, and Z).
As with services, you have a 16-bit unique UUID for an official feature, and 128-bit for a custom feature. You can find a table with the official characteristics also on the bluetooth website, and as with the other UUIDs, we can use a random one for custom use.
BLE in host mode
The first thing we are going to learn is how to make our own BLE device to be able to read and modify data from the mobile. For this we will need to install an application that allows us this communication, such as the one that I use and that is called nRF Connect.
We will start with a basic example, in which we will control an LED diode through a custom feature. The circuit that we will use will be a basic one to turn on a led:

And the code to control it will be the following:
/*
    Simple sketch to control a led with BLE protocol by
    Daniel Carrasco (https://www.electrosoftcloud.com)
*/

#include <BLEDevice.h>
#include <BLEUtils.h>
#include <BLEServer.h>

// See the following for generating UUIDs:
// https://www.uuidgenerator.net/

#define SERVICE_UUID        "3feb1e8a-3981-4045-ad39-b225135013a0"
#define CONTROL_CHARACTERISTIC_UUID "beb5483e-36e1-4688-b7f5-ea07361b26a8"
#define LED 23

char ledStatus = 48; // 0 in ASCII

// New characteristic with object to manage it
BLECharacteristic controlCharacteristic(
  CONTROL_CHARACTERISTIC_UUID,
  BLECharacteristic::PROPERTY_READ |
  BLECharacteristic::PROPERTY_WRITE
);

void setup() {
  Serial.begin(115200);
  Serial.println("Starting BLE!");

  Serial.println("Initializing device");
  BLEDevice::init("Led control electrosoftcloud"); // Initializing the device with its name
  Serial.println("Creating server");
  BLEServer *pServer = BLEDevice::createServer(); // Create the server
  Serial.println("Adding service UUID");
  BLEService *pService = pServer->createService(SERVICE_UUID); // Creating a new service into server

  // Adding a characteristic with the object name (official UUID), without object (this characteristic will not change)
  Serial.println("Adding name characteristic");
  BLECharacteristic *nameCharacteristic = pService->createCharacteristic(
                                         BLEUUID((uint16_t)0x2A00),
                                         BLECharacteristic::PROPERTY_READ
                                       );
  nameCharacteristic->setValue("Led");

  // Adding a characteristic to control the led with 0 and 1
  Serial.println("Adding control characteristic");
  pService->addCharacteristic(&controlCharacteristic);
  controlCharacteristic.setValue(&ledStatus); // Value uint8_t with length 1

  Serial.println("Starting...");
  pService->start();
  Serial.println("Creating advertising");
  // BLEAdvertising *pAdvertising = pServer->getAdvertising();  // this still is working for backward compatibility
  BLEAdvertising *pAdvertising = BLEDevice::getAdvertising();
  pAdvertising->addServiceUUID(SERVICE_UUID);
  pAdvertising->setScanResponse(true);
  pAdvertising->setMinPreferred(0x06);  // functions that help with iPhone connections issue
  pAdvertising->setMinPreferred(0x12);
  BLEDevice::startAdvertising();
  Serial.println("Characteristic defined! Now you can read it in your phone!");

  pinMode (LED, OUTPUT); // Set the LED pin as OUTPUT
}

void loop() {
  std::string controlValue = controlCharacteristic.getValue();
  if (controlValue[0] != ledStatus) {
    Serial.print("Value changed... new value: ");
    Serial.println(controlValue[0]);
    ledStatus = controlValue[0];
    if (ledStatus == 48) {
      digitalWrite(LED, LOW); // LED Off
    }
    else if (ledStatus == 49) {
      digitalWrite(LED, HIGH); // LED On
    }
  }
}
Explanation of the code
For the explanation of the code I will focus on the most complex parts, ignoring the most basic ones such as includes, macros, variables… The first thing that we will find in the code will be the definition of a BLE characteristic.
// New characteristic with object to manage it
BLECharacteristic controlCharacteristic(
  CONTROL_CHARACTERISTIC_UUID,
  BLECharacteristic::PROPERTY_READ |
  BLECharacteristic::PROPERTY_WRITE
);
This characteristic is defined outside the setup function and in this way so that it is accessible globally and we can use it in the loop function as well. In this definition we simply create an object of the BLECharacteristic type, with the name controlCharacteristic, the UUID defined at the beginning of the sketch and the functions that this characteristic will have (in this case READ and WRITE). The functions available for features are:
PROPERTY_READ: The customer will be able to read the value of this feature
PROPERTY_WRITE: The customer may modify the value of this characteristic
PROPERTY_NOTIFY: The customer will be notified when the value of the feature changes without the need to continually verify it. Used in combination with PROPERTY_READ.
PROPERTY_BROADCAST: The characteristic is emittable (for example an audio stream)
PROPERTY_INDICATE: Similar to the NOTIFY property, with the difference that a response is expected from the client.
PROPERTY_WRITE_NR: Similar to the WRITE property, with the difference that it does not wait for a response from the server.
BLEDevice::init("Led control electrosoftcloud"); // Initializing the device with its name
Serial.println("Creating server");
BLEServer *pServer = BLEDevice::createServer(); // Create the server
Serial.println("Adding service UUID");
BLEService *pService = pServer->createService(SERVICE_UUID);
In these lines, the init is responsible for initializing the bluetooth with the name that is indicated. Then a server object is created and within that object a new service is created with a unique UUID indicated above.
  BLECharacteristic *nameCharacteristic = pService->createCharacteristic(
                                         BLEUUID((uint16_t)0x2A00),
                                         BLECharacteristic::PROPERTY_READ
                                       );
  nameCharacteristic->setValue("Led");

  // Adding a characteristic to control the led with 0 and 1
  Serial.println("Adding control characteristic");
  pService->addCharacteristic(&controlCharacteristic);
  controlCharacteristic.setValue(&ledStatus); // Value uint8_t with length 1
Here we add the two features that we want to have on our device. We can see that we add one of them directly with createCharacteristic and save a pointer to the object that is created (that is why arrows are used to access its methods). The other feature as we created it earlier to be accessible from more parts of the program, we will use addCharacteristic to add an existing one. Also note that instead of using a 128-bit UUID, we use a 16-bit one. That’s because I have used the official UUID for “Device Name” instead of generating a custom one.
I know some of you will say that the pointer could have been created outside of setup and then created the two features in the same way, assigning the pointer at the time of creation. Yes, it is true, but in part I wanted to show you the two ways in which we can create the characteristics.
pService->start();
The truth is that this line requires no explanation, since it simply starts the service.
  BLEAdvertising *pAdvertising = BLEDevice::getAdvertising();
  pAdvertising->addServiceUUID(SERVICE_UUID);
  pAdvertising->setScanResponse(true);
Finally, these lines create a “propaganda” service (advertising), without which our device will not be detectable. In the first line we generate the object, saving it in the same way in a pointer. In the second line we add the service that we have created previously, and in the third we indicate that we want it to respond when it is scanned.
Connecting with our ESP32 through BLE
Once we have our ESP32 in server mode, we have to connect to read and modify its characteristics. For this, as I indicated above, we will use the nRF Connect program.
As we open it, the first thing we will have to do is press the scan button to detect nearby bluetooth devices. Our device will appear in the list and we will only have to give it to connect.

After connecting we will see that two generic services appear, which are created by the device, and a third one, which is the personalized one that we create.

We click on it and we will see that the characteristics of this service are displayed, where you can see the one that we created with an official UUID and that is therefore known (Device Name), and an unknown characteristic that is what we create customized .

With the buttons on the right we can tell if we want to read or write the data of the characteristic depending on whether we configure it as READ or WRITE.

If you give it to read in both, you will see that they contain the values that we gave them in the sketch, being Led for the device name, and 0x30 in hexadecimal for the custom service, which corresponds to 48 in decimal and “0” in ASCII.

Now let’s turn on the LED! which is what we created the custom feature for. To do this, we simply give the shipping arrow a new value.

We change the type of value to text which is the one we are handling with the drop-down on the right.
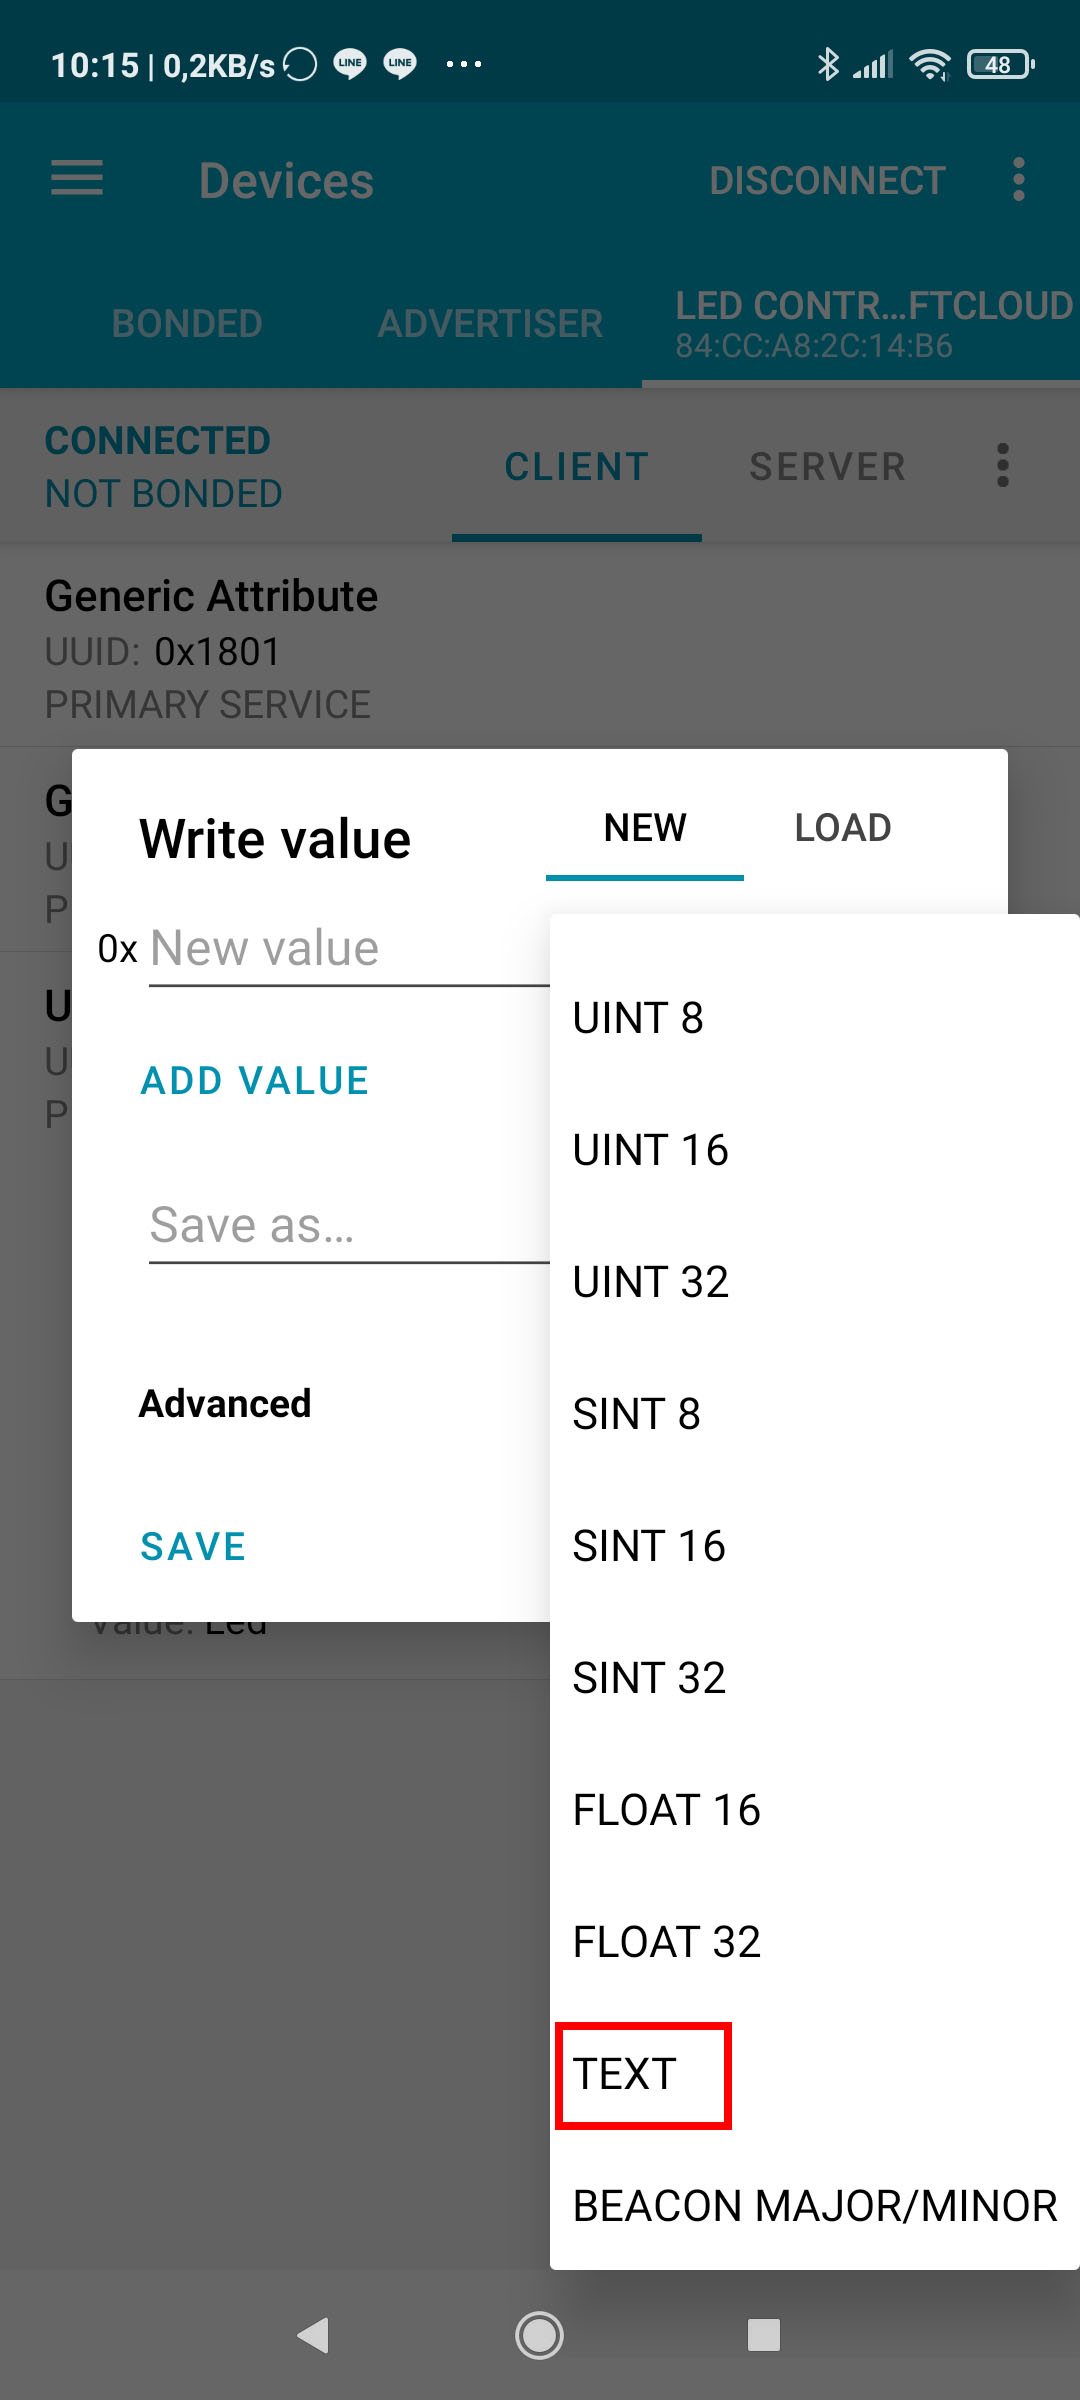
We will set the value to 1, which is the character indicated by the program that would turn on the led (49 in ASCII), and we will see how the LED turns on.

To turn it off, we simply repeat the process and put a 0 as the value of the characteristic.
Callbacks in BLE
I can’t finish the BLE host section without talking about callbacks. This functionality will allow us to respond to events such as someone reading or writing data in a feature or a client connects, and thus avoid having to be checking in the loop function if there are changes. In this case, functions will not be used as when we use bluetooth in Serial mode, but we will create a class with the functions that interest us and assign it. In the BLE connections of our bluetooth we have several types of callbacks, among which are the server callback and the feature callback.
Server callback
Server callbacks are launched when a client interacts with the host. In this case they are limited to when a client connects or disconnects.
class ServerCallbacks: public BLEServerCallbacks {
    void onConnect(BLEServer* MyServer) {
      Serial.println("A client has connected to the host");
    };

    void onDisconnect(BLEServer* MyServer) {
      Serial.println("A client has disconnected from the host");
    }
};
To assign this callback to our bluetooth server, we will simply add the following line in the setup function:
pServer->setCallbacks(new ServerCallbacks());
Feature callback
This type of callback, as its name suggests, is launched when events occur in a feature, such as reading or modifying a value.
The class for a feature callback in the led example we did above would be something like this.
class LedControlCallback: public BLECharacteristicCallbacks {
    void onWrite(BLECharacteristic *pCharacteristic) {
      std::string rxValue = pCharacteristic->getValue();

      if (rxValue.length() > 0) {
        Serial.print("Value changed... new value: ");
        Serial.println(rxValue[0]);
        if (rxValue[0] == 48) {
          digitalWrite(LED, LOW); // LED Off
        }
        else if (rxValue[0] == 49) {
          digitalWrite(LED, HIGH); // LED On
        }
      }
    }
};
And we will assign said callback to the control characteristic of the led that we created.
controlCharacteristic.setCallbacks(new LedControlCallback());
Remember that if we create the feature variable as a pointer to it, we will have to use arrows to indicate that we want to execute the methods.
With this our led code would be like this.
/*
    Simple sketch to control a led with BLE protocol by
    Daniel Carrasco (https://www.electrosoftcloud.com)
*/

#include <BLEDevice.h>
#include <BLEUtils.h>
#include <BLEServer.h>

// See the following for generating UUIDs:
// https://www.uuidgenerator.net/

#define SERVICE_UUID        "3feb1e8a-3981-4045-ad39-b225135013a0"
#define CONTROL_CHARACTERISTIC_UUID "beb5483e-36e1-4688-b7f5-ea07361b26a8"
#define LED 23

// Callback function for led switch characteristic
class LedControlCallback: public BLECharacteristicCallbacks {
    void onWrite(BLECharacteristic *pCharacteristic) {
      std::string rxValue = pCharacteristic->getValue();

      if (rxValue.length() > 0) {
        Serial.print("Value changed... new value: ");
        Serial.println(rxValue[0]);
        if (rxValue[0] == 48) {
          digitalWrite(LED, LOW); // LED Off
        }
        else if (rxValue[0] == 49) {
          digitalWrite(LED, HIGH); // LED On
        }
      }
    }
};

// New characteristic with object to manage it
BLECharacteristic controlCharacteristic(
  CONTROL_CHARACTERISTIC_UUID,
  BLECharacteristic::PROPERTY_READ |
  BLECharacteristic::PROPERTY_WRITE
);

void setup() {
  Serial.begin(115200);
  Serial.println("Starting BLE!");

  Serial.println("Initializing device");
  BLEDevice::init("Led control electrosoftcloud"); // Initializing the device with its name
  Serial.println("Creating server");
  BLEServer *pServer = BLEDevice::createServer(); // Create the server
  Serial.println("Adding service UUID");
  BLEService *pService = pServer->createService(SERVICE_UUID); // Creating a new service into server

  // Adding a characteristic with the object name (official UUID), without object (this characteristic will not change)
  Serial.println("Adding name characteristic");
  BLECharacteristic *nameCharacteristic = pService->createCharacteristic(
                                         BLEUUID((uint16_t)0x2A00),
                                         BLECharacteristic::PROPERTY_READ
                                       );
  nameCharacteristic->setValue("Led");

  // Adding a characteristic to control the led with 0 and 1
  Serial.println("Adding control characteristic");
  pService->addCharacteristic(&controlCharacteristic);
  controlCharacteristic.setValue("0"); // Value uint8_t with length 1
  controlCharacteristic.setCallbacks(new LedControlCallback());

  Serial.println("Starting...");
  pService->start();
  Serial.println("Creating advertising");
  // BLEAdvertising *pAdvertising = pServer->getAdvertising();  // this still is working for backward compatibility
  BLEAdvertising *pAdvertising = BLEDevice::getAdvertising();
  pAdvertising->addServiceUUID(SERVICE_UUID);
  pAdvertising->setScanResponse(true);
  pAdvertising->setMinPreferred(0x06);  // functions that help with iPhone connections issue
  pAdvertising->setMinPreferred(0x12);
  BLEDevice::startAdvertising();
  Serial.println("Characteristic defined! Now you can read it in your phone!");

  pinMode (LED, OUTPUT); // Set the LED pin as OUTPUT
}

void loop() {
}
As you can see, we have released the loop function for everything else, and we don’t even need the LED state variable to check if it has changed, since the callback will only be executed when there are any. Also, callbacks will be executed instantaneously even if the execution of the loop function is very long.
Among the methods that we can use in the callback are:
- onRead: This method will be called when a client reads the value of a characteristic
- onWrite: This method will be called when a client changes the value of a characteristic
- onNotify: This method will be called when a notification event occurs, for example when the server changes the value of the characteristic.
- onStatus: This method will be called in different state changes, for example when a change notification is launched and there are no connected clients, timeouts … The list of events is as follows::
- SUCCESS_INDICATE
- SUCCESS_NOTIFY
- ERROR_INDICATE_DISABLED
- ERROR_NOTIFY_DISABLED
- ERROR_GATT
- ERROR_NO_CLIENT
- ERROR_INDICATE_TIMEOUT
- ERROR_INDICATE_FAILURE
BLE in client mode
Finally one thing we have to know is how to connect to a BLE device. Mainly because this will allow us to connect to different BLE devices such as sports watches, treadmills … and recover the data they give us. In addition to in conjunction with our host created above. In this example I will show you how to connect to the host that we created earlier and turn on the LED directly from another ESP32. For this it is necessary that you have an ESP32 device with the host sketch that we did previously, and we are going to proceed to program another as a client.
BLE client code
For our client “blink” we will use the following code:
/**
 * A simple BLE client that connects to led host and make it blink
 * by Daniel Carrasco from https://www.electrosoftcloud.com
 */

#include "BLEDevice.h"


// The remote service we wish to connect to.
static BLEUUID serviceUUID("3feb1e8a-3981-4045-ad39-b225135013a0");
// The characteristic of the remote service we are interested in.
static BLEUUID    charUUID("beb5483e-36e1-4688-b7f5-ea07361b26a8");

static boolean doConnect = false;
static boolean connected = false;
static boolean doScan = false;
static BLERemoteCharacteristic* pRemoteCharacteristic;
static BLEAdvertisedDevice* myDevice;
bool ledStatus = false;

class MyClientCallback : public BLEClientCallbacks {
  void onConnect(BLEClient* pclient) {
  }

  void onDisconnect(BLEClient* pclient) {
    connected = false;
    Serial.println("onDisconnect");
  }
};

bool connectToServer() {
    Serial.print("Forming a connection to ");
    Serial.println(myDevice->getAddress().toString().c_str());

    BLEClient*  pClient  = BLEDevice::createClient();
    pClient->setClientCallbacks(new MyClientCallback());
    Serial.println(" - Created client");

    // Connect to the remove BLE Server.
    pClient->connect(myDevice);  // if you pass BLEAdvertisedDevice instead of address, it will be recognized type of peer device address (public or private)
    Serial.println(" - Connected to server");

    // Obtain a reference to the service we are after in the remote BLE server.
    BLERemoteService* pRemoteService = pClient->getService(serviceUUID);
    if (pRemoteService == nullptr) {
      Serial.print("Failed to find our service UUID: ");
      Serial.println(serviceUUID.toString().c_str());
      pClient->disconnect();
      return false;
    }
    Serial.println(" - Found our service");


    // Obtain a reference to the characteristic in the service of the remote BLE server.
    pRemoteCharacteristic = pRemoteService->getCharacteristic(charUUID);
    if (pRemoteCharacteristic == nullptr) {
      Serial.print("Failed to find our characteristic UUID: ");
      Serial.println(charUUID.toString().c_str());
      pClient->disconnect();
      return false;
    }
    Serial.println(" - Found our characteristic");

    // Read the value of the characteristic.
    if(pRemoteCharacteristic->canRead()) {
      std::string value = pRemoteCharacteristic->readValue();
      Serial.print("The characteristic value was: ");
      Serial.println(value.c_str());
    }

    connected = true;
    return true;
}
/**
 * Scan for BLE servers and find the first one that advertises the service we are looking for.
 */
class MyAdvertisedDeviceCallbacks: public BLEAdvertisedDeviceCallbacks {
 /**
   * Called for each advertising BLE server.
   */
  void onResult(BLEAdvertisedDevice advertisedDevice) {
    Serial.print("BLE Advertised Device found: ");
    Serial.println(advertisedDevice.toString().c_str());

    // We have found a device, let us now see if it contains the service we are looking for.
    if (advertisedDevice.haveServiceUUID() && advertisedDevice.isAdvertisingService(serviceUUID)) {

      BLEDevice::getScan()->stop();
      myDevice = new BLEAdvertisedDevice(advertisedDevice);
      doConnect = true;
      doScan = true;

    } // Found our server
  } // onResult
}; // MyAdvertisedDeviceCallbacks


void setup() {
  Serial.begin(115200);
  Serial.println("Starting Arduino BLE Client application...");
  BLEDevice::init("");

  // Retrieve a Scanner and set the callback we want to use to be informed when we
  // have detected a new device.  Specify that we want active scanning and start the
  // scan to run for 5 seconds.
  BLEScan* pBLEScan = BLEDevice::getScan();
  pBLEScan->setAdvertisedDeviceCallbacks(new MyAdvertisedDeviceCallbacks());
  pBLEScan->setInterval(1349);
  pBLEScan->setWindow(449);
  pBLEScan->setActiveScan(true);
  pBLEScan->start(5, false);
} // End of setup.


// This is the Arduino main loop function.
void loop() {

  // If the flag "doConnect" is true then we have scanned for and found the desired
  // BLE Server with which we wish to connect.  Now we connect to it.  Once we are
  // connected we set the connected flag to be true.
  if (doConnect == true) {
    if (connectToServer()) {
      Serial.println("We are now connected to the BLE Server.");
    } else {
      Serial.println("We have failed to connect to the server; there is nothin more we will do.");
    }
    doConnect = false;
  }

  // If we are connected to a peer BLE Server, update the characteristic each time we are reached
  // with the current time since boot.
  if (connected) {
    ledStatus = !ledStatus;
    Serial.print("Setting new led characteristic value to \"");
    Serial.print(ledStatus);
    Serial.println("\"");

    // Set the characteristic's value to be the array of bytes that is actually a string.
    if (ledStatus) {
      pRemoteCharacteristic->writeValue("1", 1); // Value and length
    }
    else {
      pRemoteCharacteristic->writeValue("0", 1); // Value and length
    }
  }else if(doScan){
    BLEDevice::getScan()->start(0);  // this is just example to start scan after disconnect, most likely there is better way to do it in arduino
  }

  delay(500); // Delay a second between loops.
} // End of loop
This code is perhaps a bit complex, but it has the advantage that it is capable of automatically discovering the devices with the service and the feature that we created earlier. BLE devices could also be scanned and connected via name, but this method seemed better to me.
In this case I will not do the explanation of the code, since it has good comments in it and also many of the things are similar to a server type.
Callbacks
Like the host mode, the client mode also has callbacks that will be executed after certain events such as connecting and disconnecting to a host. In the example above we can take advantage of customer callbacks, in addition to the advertisement ones. The latter are used in the previous code to find the feature we need on the device and thus connect to it without using the name.
Client Callbacks
For client callbacks, we will have two callbacks to detect when it has been connected or disconnected:
- onConnect
- onDisconnect
Advertising Callbacks
In this case we only have one callback, which is onResult. This callback receives as an argument an object with a series of methods available with the device that it has discovered, which are:
- BLEAddress getAddress(): Returns the MAC address of the device
- uint16_t getApperance(): Returns the device type
- std::string getManufacturerData(): Returns the data of the device manufacturer
- std::string getName(): Returns the device name
- int getRSSI(): Returns the power of the received signal
- BLEUUID getServiceUUID(): Returns the UUID of the service
- int8_t getTXPower(); Returns the transmit power
- bool haveAppearance(): Check if you have a device type
- bool haveManufacturerData(): Check if you have the manufacturer’s data
- bool haveName(): Check if your name matches
- bool haveRSSI(): Check if the received signal has at least the indicated power
- bool haveServiceUUID(): Check if the bluetooth has the service UUID
- bool haveTXPower(): Check if the transmission power is the least indicated
- std::string toString(): Convert device data to text
I hope you liked it and do not hesitate to comment
All the best!