
This time I bring you a way to reduce power consumption on Arduino. This will be very useful if your project is going to be powered by batteries and even by solar panels. If your project is basically to read a sensor every so often, you can reduce power consumption by more than 30 times.
The first thing to reduce the power consumption of our Arduino is to forget about the Arduino board. This board has a voltage regulator and a number of components that will only increase power consumption. For this purpose you can go through my post on how to create a basic Arduino, in which I create the circuit with the basic components.
Once you have the basic circuit, you will have managed to reduce the consumption of your Arduino from 46ma to approximately 8.5ma. This in itself represents an energy saving of more than 80%, making it a good start.
Energy saving with TaskScheduler
This is perhaps the easiest method of saving energy on our Arduino. You will only have to use this library to schedule the tasks, and indicate that the rest of the time stays in Sleep mode.
The energy saving of this method is medium, and is equivalent to that of Sleep mode. The difference is that you will not have to take care of managing when you have to go to sleep.
Since I already talked about this library in the previous post, I recommend that you take a look at this link.
Ahorro de energía con librería LowPower
The second easy method of doing this is with the LowPower library. This bookstore will do for us the tedious job of sticking with the Arduino registers.
The first thing we will have to do is install it. In order to install it, we can download it from its github page, but I recommend using the Library Manager.
Install LowPower library
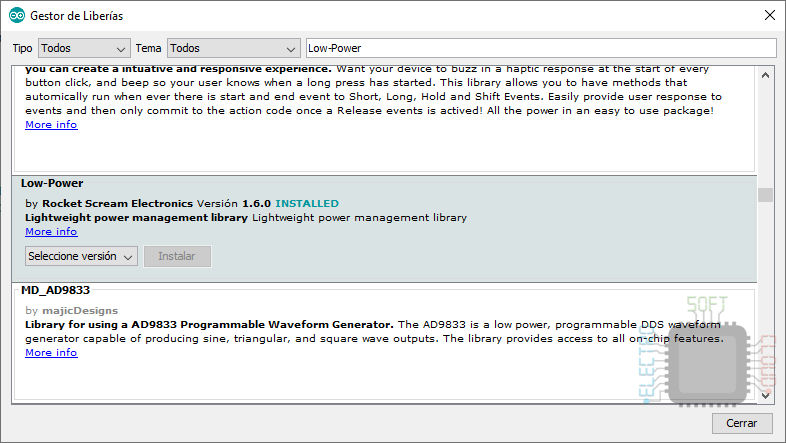
To install the library using the Library Manager, we only have to follow these steps:
- We open the administrator by giving the Tools> Library Manager menu, or pressing Ctrl + Shift + I.
- Once there, we will search for “Low-Power” (the script is important)
- From the huge list that will come out, we will have to find the one that is exactly called “Low-Power” by Rocket Scream Electronics.

Once installed, we can already start using it in our projects.
Available modes
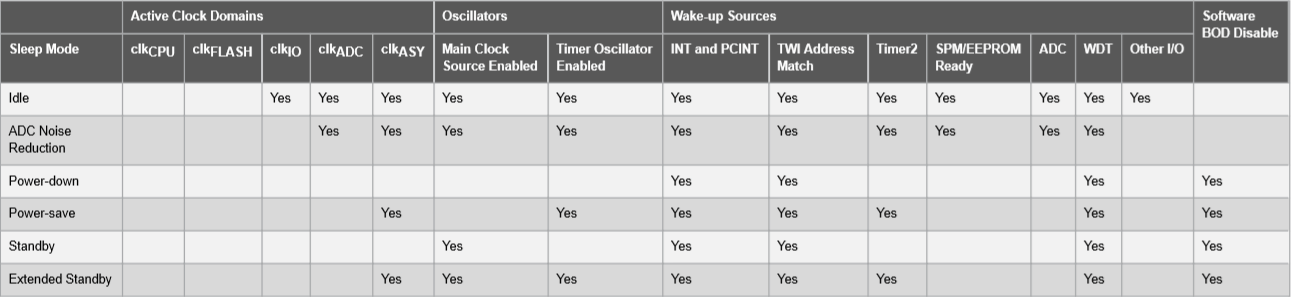
There are a total of 6 energy saving modes in our Arduino, among which we can observe:
- Idle
- ADC Noise Reduction
- Power-down
- Power-save
- Standby
- Extended Standby
Here is a table with information about the energy saving modes and which parts of the microcontroller it keeps on:
Available timers
Unfortunately the Arduino cannot sleep for a specific time, but we will have the following timers:
- SLEEP_15MS
- SLEEP_30MS
- SLEEP_60MS
- SLEEP_120MS
- SLEEP_250MS
- SLEEP_500MS
- SLEEP_1S
- SLEEP_2S
- SLEEP_4S
- SLEEP_8S
- SLEEP_FOREVER
I don’t think I need to explain how long each mode is: P. What I will do is tell you that SLEEP_FOREVER is a mode that makes our Arduino never able to wake up. The only way to wake him up would be to use an interrupt, which I’m talking about in another post of mine. It is very useful if for example we are waiting for the user to press a button to do something, and the microcontroller is asleep in the meantime.
Examples and consumption in the different modes
Once the different modes we have are known, it is time to give some examples with the consumption they have. To unify it, I will calculate the consumption based on a sensor that reads 1 second every minute. Of course, if you raise the Arduino every so often in your code, the consumption will decrease, and if you do it very often, it will increase. In any case, it will always be less than what it has in operation.
In the examples I will use a led that blinks every 2 seconds and its consumption will be far from indicated, but it is for you to see how it works.
Modo Idle
This is the first mode I will talk about, and with it we will be able to lower the consumption of our Arduino to 1.9ma. With this we will achieve a reduction in consumption of approximately 78%. If we turn on the Arduino one second every minute, the average consumption will be 2ma, achieving a real savings of 77.4%.
#include "LowPower.h"

void ledBlink(){
  digitalWrite(LED_BUILTIN, HIGH);
  delay(500);
  digitalWrite(LED_BUILTIN, LOW);
}

void setup(){
  pinMode(LED_BUILTIN, OUTPUT);
}

void loop(){
  ledBlink();
  LowPower.idle(SLEEP_2S, ADC_OFF, TIMER2_OFF, TIMER1_OFF, TIMER0_OFF,
                SPI_OFF, USART0_OFF, TWI_OFF);
}
In the function we can also indicate if we want to keep any of the options activated, although this would increase consumption.
ADC Noise Reduction mode
This mode activates the noise reduction of the ADC inputs, which can be useful for reading data with them. Anyway, I recommend sampling several samples and taking the average instead of using this mode.
This mode does not contribute much more, and the consumption is similar to that of the Idle mode.
#include "LowPower.h"

void ledBlink(){
  digitalWrite(LED_BUILTIN, HIGH);
  delay(500);
  digitalWrite(LED_BUILTIN, LOW);
}

void setup(){
  pinMode(LED_BUILTIN, OUTPUT);
}

void loop(){
  ledBlink();
  LowPower.adcNoiseReduction(SLEEP_2S, ADC_OFF, TIMER2_OFF);
}
PowerDown mode
This is undoubtedly one of the modes that will give us the most energy savings, but of course, the one that will have the least active things. This will make it not valid for all projects, but if your project is to read from a sensor, it is surely the best.
With this mode the consumption is reduced to 0.024ma, which is an incredible reduction (a real reduction of 98%). If we put BOD to off we can get even more savings, being the consumption of only 0.005ma (a real reduction of 98.3%).
#include "LowPower.h"

void ledBlink(){
  digitalWrite(LED_BUILTIN, HIGH);
  delay(500);
  digitalWrite(LED_BUILTIN, LOW);
}

void setup(){
  pinMode(LED_BUILTIN, OUTPUT);
}

void loop(){
  ledBlink();
  LowPower.powerDown(SLEEP_4S, ADC_OFF, BOD_ON);
}
PowerSave mode
This mode is very similar to the PowerDown mode, and the power consumption it will give us is the same as that provided by this one.
#include "LowPower.h"

void ledBlink(){
  digitalWrite(LED_BUILTIN, HIGH);
  delay(500);
  digitalWrite(LED_BUILTIN, LOW);
}

void setup(){
  pinMode(LED_BUILTIN, OUTPUT);
}

void loop(){
  ledBlink();
  LowPower.powerSave(SLEEP_4S, ADC_OFF, BOD_ON, TIMER2_OFF);
}
Standby mode
The penultimate mode of those available is the Standby mode. This mode is an intermediate between Idle mode and PowerDown mode, and has a consumption of approximately 0.47ma. This will give us a reduction in consumption of 92.9%. If we deactivate the BOD the consumption is reduced to 0.45ma, which increases the saving to 93.2%.
#include "LowPower.h"

void ledBlink(){
  digitalWrite(LED_BUILTIN, HIGH);
  delay(500);
  digitalWrite(LED_BUILTIN, LOW);
}

void setup(){
  pinMode(LED_BUILTIN, OUTPUT);
}

void loop(){
  ledBlink();
  LowPower.powerStandby(SLEEP_4S, ADC_OFF, BOD_ON);
}
ExtendedStandby mode
Este es ya el último de los modos de los que os hablaré. Este modo ofrecerá un ahorro energético ligeramente inferior al modo Standby, siendo el consumo de 0,48ma. Esto nos dará una reducción del consumo de un 92,8%. Si desactivamos el BOD el consumo se reduce a 0.45ma, lo cual aumenta el ahorro al 93.2%.
#include "LowPower.h"

void ledBlink(){
  digitalWrite(LED_BUILTIN, HIGH);
  delay(500);
  digitalWrite(LED_BUILTIN, LOW);
}

void setup(){
  pinMode(LED_BUILTIN, OUTPUT);
}

void loop(){
  ledBlink();
  LowPower.powerExtStandby(SLEEP_4S, ADC_OFF, BOD_ON, TIMER2_OFF);
}
Información acerca del BOD
El BOD o Brown-Out-Detection, es un sistema del microcontrolador que monitoriza el voltaje que está recibiendo. Si dicho valor es demasiado bajo, el microcontrolador se apaga para evitar dañosy es por ese motivo que salvo que tengas otros modos de monitorizar la energía y de apagar el microcontrolador, no recomiendo que se desactive.
Un saludo!