Some time ago I made a post about how to improve the analog readings of your Arduino. Today I bring you part 2, in which I add new methods to improve the readings. In this post I will focus on the VREF settings, and on a new functionality that I have added to the library that I made for this purpose.
Arduino: adjusting the VREF
Some microcontrollers, such as Arduino, use the power supply as a standard for the ADCs. This in the laboratory is very comfortable and usually works well, but in real life it can cause problems.
For example, in the ADC calculation we usually take as a reference the 5v power supply of Arduino. This is a problem, because the power supply may be delivering 5.1v or 4.9v. Taking this into account, your Analog measurements will be inaccurate.
It can also be the case that you power your Arduino with batteries, which give at most 4.2v and can go down to 3v. As the voltage drops, the measurements will become more inaccurate.
How do we solve this?
If you want to improve the Arduino analog readings, you can use the VREF pin for example. This pin allows us to enter a reference voltage to our liking to calibrate the ADC. If we anticipate that the voltage may drop to 3v, you can put a 2v LDO regulator on the VREF pin. This allows you to use this reference voltage in your ADC measurements and it will be accurate regardless of whether the supply voltage varies.
To use the VREF pin for your measurements in Arduino, you would have to put the following line in the setup block of your project:
analogReference(EXTERNAL);
Another possibility that Arduino gives us is to use the internal reference of the microcontroller. This voltage is 1.1v and is fixed regardless of the outside voltage, so it is a stable reference. To activate it we can put the following line in the setup block of our project:
analogReference(INTERNAL);
Other microcontrollers like the Arduino Mega also provide an internal 2.56v reference. If you want more information, you can go through the Arduino documentation.
It is very important that when calculating your ADC measurements you use the reference voltage in your calculations. The measurement range will always be from 0 to 1023, regardless of the reference voltage. So for a 1.1v reference, 0.55v will give 512 as a result, while for a 5v reference it will be approximately 112.
How to improve analog readings
I have already told you about how to improve accuracy by adjusting the VREF. It is very important since without a good reference the measurements will always be incorrect. Once this is done, now we have to see the part of reducing the error due to electrical fluctuations. The ADC pin will always be subject to interference, so ADC measurements will rarely be stable. To stabilize them we can use several methods, but here I will talk about the condenser method, and through mathematical calculations.
Using a capacitor
Capacitors are used to reduce fluctuations in voltage in power supplies. What better component than this can we use for our purpose. Simply putting a 0.1uf capacitor between ground and the ADC pin that we are going to use will help eliminate unwanted peaks in the measurements.
Using math to improve analog readings
Mathematics are our friends on many occasions, and this is not going to be one less. To improve the analog readings there are different methods, but I will talk about the basic average, and the exponential moving average. These two methods are simple and very useful.
Basic average
The basic mean, as its name suggests, is the basic method of taking the average of a series of numbers. To do this, we add X numbers, and divide the total by the number of numbers. This average bases its precision on the number of numbers we use, so if for example we use 4 and there is a peak in one of them, it will be more imprecise than if we use 10.
This is math, so let’s put numbers on it. Suppose the case of the four numbers and that in one there is a peak:
media = (n1 + n2 + n3 + n4) / 4
If, for example, n2 suffers from interference and we receive a peak in the measurement, the result will be the following:
media = (123 + 220 + 125 + 121 ) / 4 = ~147
There it is clear that the average should be around 121-125, but having received a spike in one of the measurements, we lose precision and it comes out very high. If instead of using 4 measurements, we use 10 and receive a peak, this problem will be mitigated, so the more measurements we use in the mean, the more accurate it will be.
media = (123 + 220 + 125 + 121 + 120 + 127 + 123 + 121 + 125 + 120) / 10 = ~132
As you can see, the precision is still a bit low but it is closer to reality.
Exponential moving average
As you may have noticed, the basic mean is a bit imprecise and vulnerable to spikes in measurements. You depend on taking a lot of measurements to get a more accurate average. For this reason, to improve this problem we can use slightly more complex formulas that reduce this error. One of them is the exponential moving average, and its formula is:
media = (alfa * medición2) + ((1 - alfa) * medida1)
In this formula, alpha is a float number between 0 and 1, with 0.05 or 0.1 being the most used.
If we analyze the formula, it is quite simple. We take the new measurement (measurement2), and we multiply it by alpha, so we get a percentage of it (0.05 = 5%). Then we add this amount to the remaining percentage (1 – 0.05 = 0.95 = 95%), from the old measurement (measurement1). With this we achieve that only a part of the new measurement affects the final result, and of course, the higher the alpha is, the more it will affect. Normally as an old measurement we use the average taken from the previous calculation.
Let’s take the example of the four numbers from before:
media = (220 * 0,05) + ((1 - 0,05) * 123) = 127,85
media = (125 * 0,05) + ((1 - 0,05) * 127,85) = 127,70
media = (121 * 0,05) + ((1 - 0,05) * 127,70) = 127,37 -> INT -> 127
As you can see, although the mean is still a bit high, it is much more accurate than the basic mean, getting 4 numbers closer to the real measurement than even the basic mean of 10 numbers from before. This type of average helps reduce the amount of fluctuations and has the advantage that you do not have to keep track of the number of numbers used like the basic one. With this simple Python code we take the average of the 10 numbers above:
numbers = [123, 220, 125, 121, 120, 127, 123, 121, 125, 120]
alfa = 0.1

# We take the first average between the first two numbers
media = (alfa * numbers[1]) + ((1 - alfa) * numbers[0])

# We perform the exponential moving average using the rest of the numbers
for i in range(2, len(numbers)):
    media = (alfa * numbers[i]) + ((1 - alfa) * media)

print(media)
This example returns 126, which is even a little closer to the true mean without the fluctuation. In addition, the good thing is that it allows us to adjust as if it were a potentiometer, how much the new measurement affects the previous average through alpha. Thus with an alpha of 0.1 we will get an average of 127, which is a little higher because the peak affects the average more.
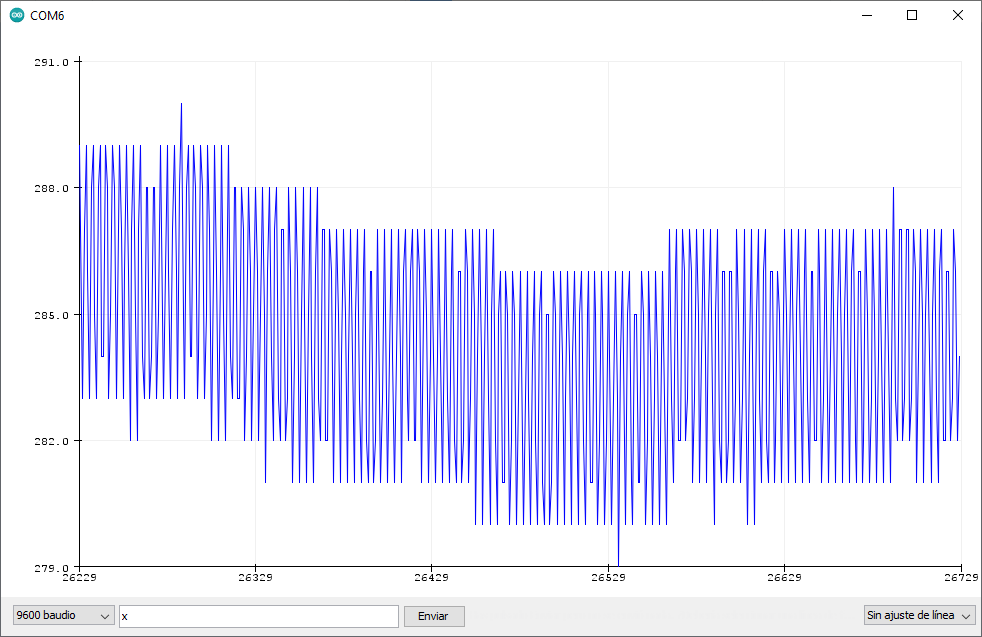
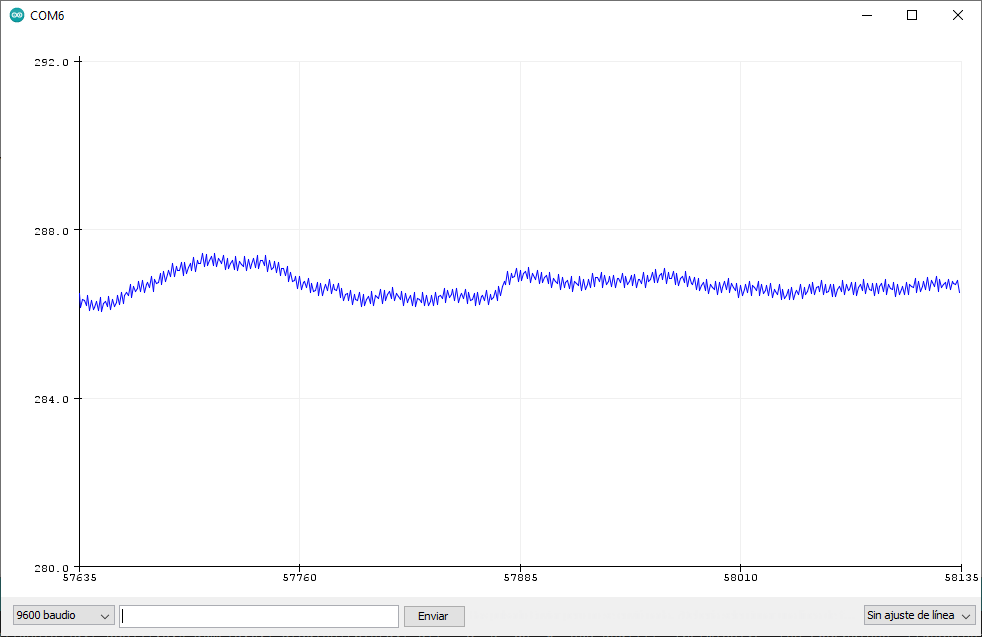
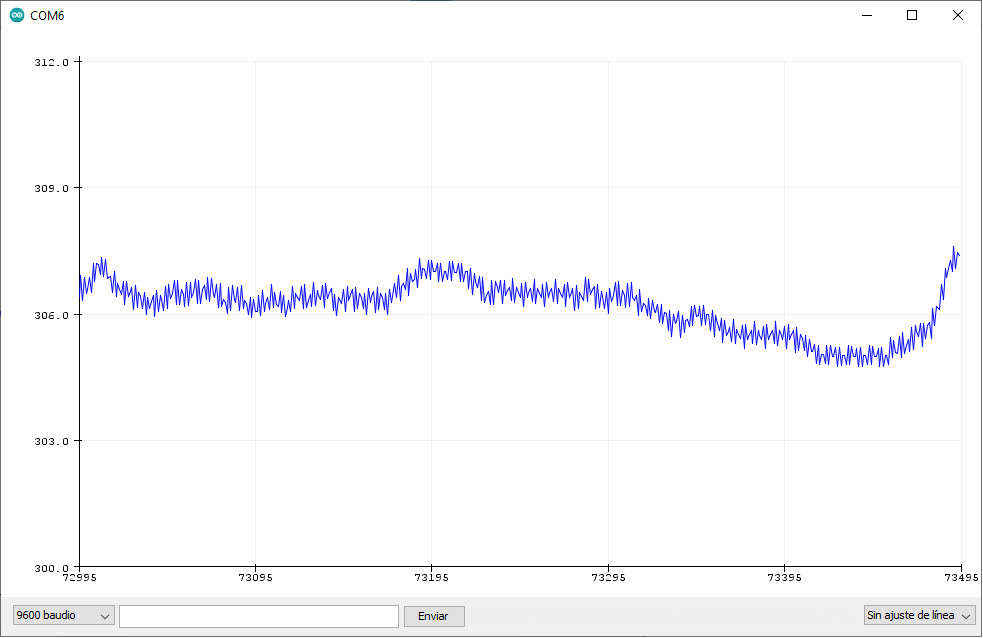
In short, the alpha controls how stable the mean is. The higher the alpha, the more it fluctuates, so depending on the use it can be adjusted. For example, for a hygrometer or a thermometer it will be good for this number to be low because its variation is slow and very low, but for other cases, such as measuring the voltage of something connected, it may be better for us to raise it to detect changes earlier. To see it better, here are three screenshots in which you will see the real value, and how it would be with alpha is 0.05 and 0.2. In them you have the measurements of a floating ADC, which will vary very abruptly due to interferences due to not having anything connected.


As you can see, the higher the alpha is, the more the fluctuations are noticeable. Obviously this is an exaggerated example and the ADC should not fluctuate that much. Also ignore the number of the last capture, which is higher than 300 while the others are less than 288. For some reason the interference increased while I was capturing, but I verified the value and it is correct. Maybe someone put the washing machine in the area …
Use the library
Above I told you that I had created a library for this purpose, and yes, I am a bit comfortable. The function is simple and easy to implement, so it does not need a library. What are you going to do, I am like this, I like to have it as a library to use it whenever I want with two simple methods. If you are also that comfortable, you can see how to download and install this library in part 1 of this series of posts.
To use it, you simply have to install it as indicated in that post, add it to your sketch, initialize the object and enjoy it. I give you some example lines with the floating ADC so that you can do your experiments:
#include <averager.h>

float alpha = 0.05;
averager<float> average;

void setup() {
  Serial.begin(9600);
  // Default is 0.1, so must be changed if we needs a different alpha
  average.setExponentialMovingAverageAlpha(alpha);
}

void loop() {
  uint16_t new_value = analogRead(A0);
  average.updateExponentialMovingAverage(new_value);

  Serial.println(average.getExponentialMovingAverage());
}
Greetings and do not hesitate to comment on the doubts or if you simply want to thank me.
