
In this post I will try to show you some tips on how to save space in the SRAM memory of your Arduino. As we all know, our Arduino is limited in resources, and that is why we have to make the most of our ingenuity and the tools they provide us to try not to waste it.
Avoid use of strings
The string is a type of variable very comfortable, easy to use and with various functionalities, but in return it has the defect of wasting resources. Apart from wasting CPU cycles, it also consumes more memory and therefore will greatly limit its use in Arduino. Therefore, instead of using Strings, we should use char whenever possible.
In the following example:
String hello = "Hola Mundo";
char hello[] = "Hola Mundo";
Both statements seem the same and will give us the same result, but nevertheless, the String option will consume us more resources than using char.
Use the right type of variable
Using the most appropriate type of variable for what we want to do is important, since otherwise we could be wasting SRAM memory. For example, if we anticipate that we are going to use a number between zero and one hundred, if we use a float type variable we would be wasting memory.
In the following example:
int cien = 100;
float cien = 100;
double cien = 100;
In the three options of arriving we will have the same number, but float and double will consume twice as much as int. On top of that, if instead of using int we use char or byte, we will be consuming half.
If you want more information about the types of variables, you can go through my post Arduino: Variable data types.
Use Progmem
Progmem will allow us to store variables in the programming memory instead of in the SRAM, so if we have variables that are not going to change throughout the program and we have free program space, we can pass them to this by freeing SRAM.
const PROGMEM uint16_t num = 512;
const PROGMEM uint16_t numsArray[] = { 500, 20, 12 };
const char holaMundo[] PROGMEM = {"Hola Mundo"};
const PROGMEM char holaMundo[] = {"Hola Mundo"};
const PROGMEM char character = "A"
It is important to use the correct function to recover the data, since depending on which one we use, it will return one type of variable or another.
Using the example above as a basis, we will extract the data as follows:
for (byte k = 0; k < 5; k++) {
    displayInt = pgm_read_word_near(numsArray + k);
    Serial.println(displayInt);
}
for (byte k = 0; k < strlen_P(char ); k++) {
    myChar = pgm_read_byte_near(char + k);
    Serial.print(myChar);
}
In the examples above you can see how to retrieve variables of the word and byte type from the programming memory, but in addition to these there are others, which we can see in the references below.
For more information it is recommended to read the following links, where we can find the official documentation of how to use PROGMEM and the options available to us to extract the data.
- https://www.arduino.cc/reference/tr/language/variables/utilities/progmem/
- https://www.nongnu.org/avr-libc/user-manual/group__avr__pgmspace.html
Use the F function with the strings
If we have no choice but to use strings or we have Serial.print messages, we can use the function F (in capital letters) with each text in String format to indicate that it is stored in the programming memory instead of using the SRAM:
Serial.println(F("Hello World"));
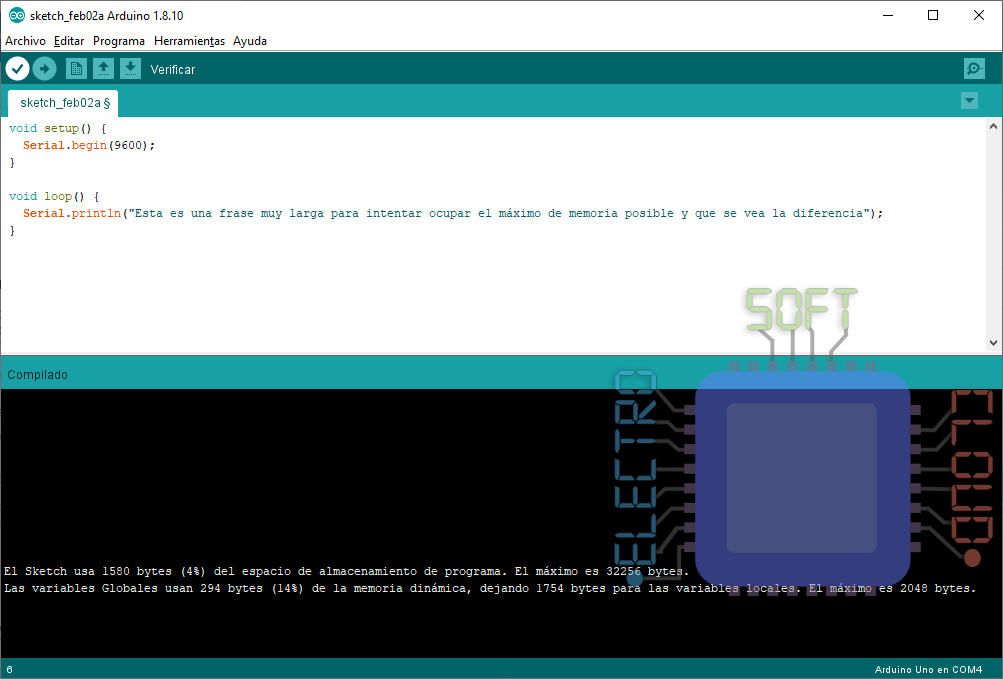

As can be seen in the images above, the F function has a great impact in terms of memory saving, which is quite remarkable. The consumption of SRAM without its use is 294 bytes, while using it is only 188 bytes (a reduction of 106 bytes). Meanwhile, we observe that the consumption of programming memory has grown by only 12 bytes, so the savings are considerable in both aspects.
Group Booleans in one byte
By definition a boolean uses a byte of memory, so to indicate one or zero we will be consuming 8 bits. If for example we have 8 LEDs and we want to save their status, using Boolean we will be consuming 8 bytes, while if we use bits we can store that information in a single byte.
// Tenemos 8 leds y queremos guardar su estado
//
// Con este método utilizaremos 8 booleans (8 bytes)
bool led1 = true;
bool led2 = true;
bool led3 = false;
bool led4 = true;
bool led5 = false;
bool led6 = false;
bool led7 = true;
bool led8 = true;

// Esto es equivalente, pero sólo usaremos un byte
// el 0b del principio es para indicar que se trata de bits
byte leds = 0b11010011;
As you can see, we have managed to save the same amount of data in 8 times less space. Even so, the example of bits above would not be entirely correct, and now we will explain why.
Recover bits
Once we have created our byte variable with 8 booleans, we will need to extract each of them in order to use them. For this we will use the function bitRead, but we have to keep in mind that this function retrieves the bytes from right to left, and that is the reason why the example above is not correct.
byte leds = 0b01010011;
if (bitRead(leds, 0)){
    Serial.println(F"El led 1 está encendido");
} else {
    Serial.println(F"El led 1 está apagado");
}
In the example above we will receive a message saying that the LED is on, since it will read the bit that is more to the right.
Change bits
As we can recover the bits, we can also change the ones there are to change the status of a led for example. For this we will use the function bitWrite, and like bitRead, this function will also write from right to left:
byte leds = 0b01010011;
bitWrite(leds, 0, 0);
if (bitRead(leds, 0)){
    Serial.println(F"El led 1 está encendido");
} else {
    Serial.println(F"El led 1 está apagado");
}
In this example we have previously changed the status of the led one to zero (off), so the message we will receive will be that it is off.
Another method of changing the state of the bits is to use bitwise, which is more convenient since it will allow us to change several bits at the same time.
Using bitwise operations
Bitwise and allows to change a bit to zero for example, maintaining the state of the rest.
byte leds = 0b01010011;
// Bitwise AND: nos permitirá cambiar bits a 0
leds = leds & B11111110; // El resultado es 0b01010010
To better understand how it works, we will use a table to compare:
| A | B | Resultado |
| 0 | 1 | 0 |
| 1 | 1 | 1 |
| 0 | 1 | 0 |
| 1 | 1 | 1 |
| 0 | 1 | 0 |
| 0 | 1 | 0 |
| 1 | 1 | 1 |
| 1 | 0 | 0 |
As we can see, the bitwise and returns one if both bits are one, and zero if any of them is zero.
If instead we want to convert some bit to one, we will have to use the bitwise or which will result in zero if both are zero, or one if either is one:
byte leds = 0b01010011;
// Bitwise AND: nos permitirá cambiar bits a 1
leds = leds & B10000000; // El resultado es 0b11010011
As before, we will put a table to see better how it works:
| A | B | Resultado |
| 0 | 1 | 1 |
| 1 | 0 | 1 |
| 0 | 0 | 0 |
| 1 | 0 | 1 |
| 0 | 0 | 0 |
| 0 | 0 | 0 |
| 1 | 0 | 1 |
| 1 | 0 | 1 |
As we can see, in this case all the zeros and some have been maintained, and the first bit has changed.
I hope it has helped you at least save SRAM space on your Arduino.
Greetings!.